
Complete Guide to Drip Irrigation System Installation: Step-by-Step Setup for Efficient Farm Irrigation
Drip irrigation is one of the most efficient ways to deliver water directly to the root zone of plants. Unlike conventional irrigation methods that distribute water over large areas, a properly installed drip irrigation system supplies controlled quantities of water close to the plant roots, helping reduce water wastage and improve irrigation management.
Whether you are setting up irrigation for vegetables, fruits, nurseries, flowers, row crops, or other agricultural applications, choosing the right drip irrigation pipes, drip lines, drip tape, filters, fittings, and accessories is important for reliable performance.
At Accent Internationals, we manufacture and supply drip irrigation pipes, drip irrigation system kits, 16 mm drip tape, and drip lines for agricultural and irrigation applications. This guide explains how to install a complete drip irrigation system from the water source to the crop area.
What Is a Drip Irrigation System?
A Agriculture drip irrigation system is a low flow irrigation arrangement designed to deliver water gradually and directly to the root zone of plants.
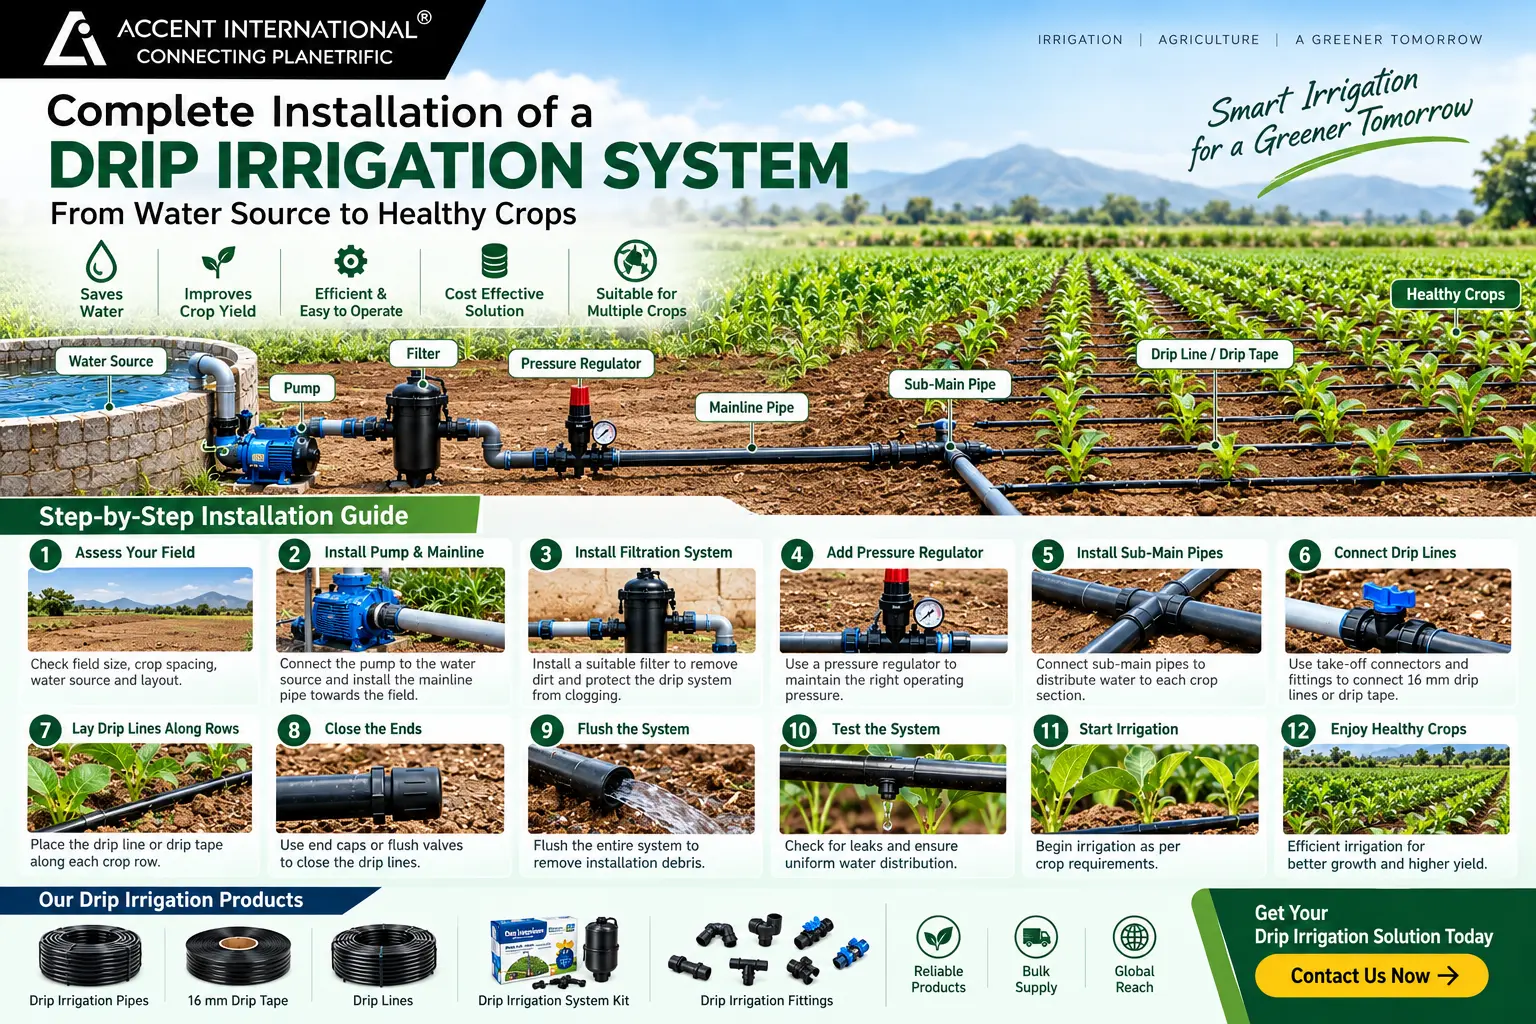
A typical system consists of:
- Water source
- Pump
- Mainline pipe
- Filter
- Fertilizer/venturi unit, where required
- Pressure regulator
- Sub-main pipe
- Drip irrigation fittings
- 16 mm drip line or drip tape16 mm inline Drip Irrigation System
- End caps or flush valves
- Control valves
- Connectors and take-offs
The exact configuration depends on the crop, field size, water source, required flow rate, pressure, and irrigation layout.
How to Install a Drip Irrigation System?
Step 1: Assess the Field and Water Source
Before purchasing components, inspect the field and determine how the irrigation system will be laid out.
Consider:
- Total field area
- Crop spacing
- Row-to-row distance
- Plant-to-plant distance
- Water source location
- Available water quantity
- Pump capacity
- Field slope
- Required irrigation zones
- Distance from the water source to the field
This information helps determine the required drip irrigation pipe size, drip line length, number of laterals, filtration requirements, and fittings.
For larger agricultural fields, dividing the field into separate irrigation zones can help maintain more consistent pressure and water distribution.
Step 2: Plan the Drip Irrigation Layout
Create a simple layout before installation.
A basic arrangement can look like:
Water Source → Pump → Filter → Pressure Regulator → Mainline → Sub-Main → Drip Line/Drip Tape → End Flush
The mainline carries water from the source toward the field. Sub-main pipes distribute water to different sections, while the drip lines or drip tapes run alongside crop rows.
Proper planning is important because unnecessarily long drip laterals can result in pressure variation and uneven water distribution.
Step 3: Install the Pump and Mainline
Connect the pump to the water source and install the mainline leading toward the agricultural field.
The mainline should be selected according to:
- Required flow
- Total length
- Pump capacity
- Number of irrigation zones
- Expected operating pressure
Use suitable agricultural irrigation pipes and properly secure the connections to minimize leakage.
For permanent installations, the mainline can be installed underground where appropriate. For temporary or seasonal systems, surface installation may be preferred.
Step 4: Install the Filtration System
Filtration is one of the most important parts of a drip irrigation system.
Water may contain:
- Sand
- Soil particles
- Organic matter
- Algae
- Small debris
These particles can enter emitters and cause clogging.
Install the appropriate filter after the water source/pump and before the water enters the drip network.
Depending on water quality and system requirements, different filtration arrangements may be used.
Why filtration matters
A good filtration system helps protect the drip line, drip tape, emitters, and irrigation fittings from unwanted particles and supports consistent water delivery.
Step 5: Install Pressure Regulation and Control Valves
Drip irrigation systems generally operate at controlled pressure.
Install a suitable pressure regulator after filtration where required. Control valves can then be used to divide the field into different irrigation zones.
This allows the operator to irrigate individual sections according to crop requirements instead of supplying the entire field simultaneously.
Pressure management is particularly important when using 16 mm drip lines or drip tapes, because excessive pressure can damage the product or affect uniform water delivery.
Step 6: Install the Sub-Main Pipes
The sub-main carries water from the mainline to individual crop sections.
Position the sub-main according to the field layout and connect it to the mainline using appropriate irrigation fittings and valves.
From the sub-main, take individual connections toward each crop row.
The size and arrangement of the sub-main should be selected according to the number and length of drip laterals it needs to supply.
Step 7: Connect the 16 mm Drip Line or Drip Tape
This is where the water distribution network reaches the plants.
For many row-crop applications, 16 mm drip irrigation lines and drip tapes are widely used because they are convenient to install along individual crop rows.
Make a connection from the sub-main to the drip line using suitable:
- Take-off connectors
- Grommets
- Start connectors
- Mini valves
- Elbows
- Joiners
Lay the drip line or drip tape carefully along the crop row.
Important installation tips
Keep the drip line reasonably straight and avoid sharp bends.
Ensure the outlet/emitter position is oriented correctly according to the manufacturer’s product design.
Avoid dragging the tape over sharp stones, agricultural equipment, or other objects that could damage it.
Do not stretch the drip tape excessively during installation.
Step 8: Position the Drip Line Correctly
The positioning of the drip line depends on the crop and irrigation design.
For row crops, the line is commonly placed alongside the plants.
For some crops, drip lines may be installed on the soil surface, while other agricultural systems may use subsurface installation.
The distance between the drip line and plants should be determined according to:
- Crop type
- Soil type
- Root zone
- Emitter spacing
- Required discharge
- Irrigation frequency
Correct positioning helps water reach the desired root zone efficiently.
Step 9: Close the Ends of the Drip Lines
After laying the drip lines, close their ends using suitable end caps, end plugs, folds, or flush valves depending on the system design.
Flushable ends are useful because they allow accumulated particles to be removed from the lateral.
Before permanently closing the lines, it is a good practice to flush the system.
Step 10: Flush the Entire System
Before starting normal irrigation, open the ends of the mainlines, sub-mains, and drip laterals as appropriate and allow water to flow through the system.
Flushing helps remove:
- Dirt
- Plastic particles
- Soil
- Installation debris
- Other contaminants
Once the water runs clean, close the lines and prepare the system for operation.
This step should not be skipped, especially in a newly installed drip irrigation system.
Step 11: Test the Drip Irrigation System
Start the system gradually and check the complete network.
Inspect:
- Pipe connections
- Drip line connections
- Filters
- Valves
- Fittings
- End caps
- Emitters
- Pressure
- Water distribution
Look for leaks or damaged sections.
Walk along the crop rows and check whether the emitters are delivering water properly.
If one section is receiving significantly more or less water than another, check for pressure differences, blocked emitters, incorrect connections, or unsuitable system sizing.
Step 12: Start Irrigation According to Crop Requirements
Once the system has been tested, establish an irrigation schedule based on the crop and local growing conditions.
Irrigation frequency can vary depending on:
- Crop stage
- Soil type
- Weather
- Temperature
- Rainfall
- Evapotranspiration
- Root-zone requirements
Rather than following one fixed schedule for every crop, adjust irrigation according to actual field requirements.
Drip Irrigation System Installation Checklist
Before operating your system, make sure you have:
Component | Purpose |
Water source | Provides irrigation water |
Pump | Moves water through the system where required |
Filter | Removes particles and reduces clogging risk |
Pressure regulator | Helps maintain suitable operating pressure |
Mainline | Carries water toward the field |
Sub-main | Distributes water to crop sections |
16 mm drip line/tape | Delivers water along crop rows |
Take-off connectors | Connect laterals to the sub-main |
Valves | Control irrigation zones |
End caps/flush valves | Close and flush lateral ends |
Drip irrigation fittings | Connect and route the system |
Common Mistakes to Avoid During Drip Irrigation Installation
Installing drip lines without filtration
Unfiltered water can increase the risk of emitter clogging.
Ignoring operating pressure
Excessive or insufficient pressure can affect system performance.
Using unsuitable fittings
Poor-quality or incorrectly sized fittings can cause leakage and connection failures.
Skipping system flushing
Debris left inside the pipes can reach the emitters.
Installing unnecessarily long laterals
Long drip lines can contribute to pressure variation depending on the product and system design.
Poor end closure
Improperly closed lateral ends can cause leakage and make flushing difficult.
Not checking the system after installation
A newly installed system should always be tested before regular irrigation begins.
How to Choose the Right Drip Irrigation Pipe and Drip Line
Selecting the Correct drip irrigation product depends on the application rather than simply choosing a particular diameter.
Consider:
Crop: Different crops require different emitter spacing and discharge requirements.
Row spacing: The lateral arrangement should match the crop layout.
Field size: Larger fields may require multiple irrigation zones.
Water quality: Filtration requirements depend on the water source.
Operating pressure: Select products according to their specified pressure and application requirements.
Installation method: Surface and subsurface installations may require different product considerations.
Irrigation duration: Flow rate and emitter spacing should be considered when designing the irrigation schedule.
Why Choose Accent Internationals for Drip Irrigation Products?
Accent Internationals is a manufacturer and supplier of drip irrigation products, serving agricultural irrigation requirements with products designed for practical field applications.
Our product range includes:
- Drip Irrigation Pipes
- Drip Irrigation System Kits
- 16 mm Drip Tape
- Drip Lines
- Drip Irrigation Fittings
- Agricultural irrigation accessories
Whether you need components for a small farm, horticulture project, nursery, greenhouse, or larger agricultural irrigation application, the right combination of products can help you build a properly planned irrigation network.